Arrrrrr!
2 weeks ago

 I had a idea. Let's save some work and leave the side panels in place. We can insulate and cover them over. But the wall chair support has to go which also supports the panels.
So I got some self-tapping screws and set them at the bottom of the lateral supports.
I had a idea. Let's save some work and leave the side panels in place. We can insulate and cover them over. But the wall chair support has to go which also supports the panels.
So I got some self-tapping screws and set them at the bottom of the lateral supports.
 With a 1/2 inch drive drill motor I removed the large Phillps head screws and...........
 BANG.
BANG.
 The whole unit hit the floor. LOL, so much for saving time. Back to the old addage"if you do it right the 1st time...". On the bright side, we have more salvage. Now I have to remove all the self-tapping screws. Once I got it cleaned up, I found a nice clean wall we can properly insulate and cover with bead board. Also, the panel spacers are held in place with a sealant and come right off. I can't wait, I have to do some framing.

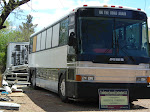
 About our MCI Bus
 conversionsSpecifications - Length: 40 feet, Width: 102 inches, Height: 133 inches, Wheelbase: 285 inches, Turn radius: 44 feet, Typical Engines: DDA 8V-71, DDA 6V-92TA, DDA 8V-92TA, Seating: 43-49, Luggage: 319 cubic feet, Aisle width: 14 inches, Front door width: 24 inches
  Please Comment Below
 Removal of the ramp
Everything on this rig is built like a tank, even the ramp. 1st we need to clean the crud out of the screw heads. Lots of dirt crammed in them. I used a knife blade to break it up then blew it out. Remove the large Phillips screws then the small screws along the front sides. Then take your trusty flat bar and work it under the edge of the ramp to pry it up. When it pops loose, place a wedge under it so you can grip it with hands and lift it up and out of the floor. Do not step into the void as the plywood decking is only 1/4 inch thick and you may go through it. You will find more trash and coins here. Mmm, treasure! This ramp
Removal of the ramp
Everything on this rig is built like a tank, even the ramp. 1st we need to clean the crud out of the screw heads. Lots of dirt crammed in them. I used a knife blade to break it up then blew it out. Remove the large Phillips screws then the small screws along the front sides. Then take your trusty flat bar and work it under the edge of the ramp to pry it up. When it pops loose, place a wedge under it so you can grip it with hands and lift it up and out of the floor. Do not step into the void as the plywood decking is only 1/4 inch thick and you may go through it. You will find more trash and coins here. Mmm, treasure! This ramp  is stout, I'll have to find a good use for it. Mmm, salvage.
Tomorrow, we frame in the void. Honey, get me the hammer and saw. We're Building, Baby!
is stout, I'll have to find a good use for it. Mmm, salvage.
Tomorrow, we frame in the void. Honey, get me the hammer and saw. We're Building, Baby!
 This mostly consists of air shafts that run along the base of the side walls. Made of stainless steel ducting, it is rumored to be the resting place for all the lost small objects. Start in the front and remove all the screws (Philips) from the floor. Now the duct was built in sections. Remove the screws that connect each section. With a flat bar, lift the section, grab it and pull up and toward you. The top of the duct is only in a groove and will come free. Each section you remove is like a treasure hunt. Lots of coins, postcards, casino memorabilia, ballpoint pens, tokens and 2 ear
  rings (1 gold and 1 small diamond) Oh, and a lot of trash.
Lots of good stainless
steel to be salvaged here. On to the air defusers we just uncovered. These are made of aluminum and are riveted to the wall. Drill out or shear them off to remove the fixture. You will find one on each side.
OK, to the rear return air housing. these are also on both sides. These are again made of aluminum and are riveted to the wall. Drill
rings (1 gold and 1 small diamond) Oh, and a lot of trash.
Lots of good stainless
steel to be salvaged here. On to the air defusers we just uncovered. These are made of aluminum and are riveted to the wall. Drill out or shear them off to remove the fixture. You will find one on each side.
OK, to the rear return air housing. these are also on both sides. These are again made of aluminum and are riveted to the wall. Drill  out or shear them off to remove the fixture. You will find
more stuff in the duct in the floor. Next the ramp.
out or shear them off to remove the fixture. You will find
more stuff in the duct in the floor. Next the ramp.

All the Best, Michael & Christi Please Comment Below
 Removal of the Over Head Storage Compartments. Part 3
  for more manageable pieces. Go ahead and drill out or shear off the 2 rivets, then remove the 2 screws from the shield. Then un-do the heavy aluminum junction plate from the main heavy aluminum rail. Now remove the star screws, grab one end and wiggle the rail off the wall. The components are a little long and should be fed out a window but can fit out the door. Once outside, you can disassemble the components for salvage. We will be re-using a lot of this.


 e comfort centers. These are held fast by rivets in insulated grommets. Drill out the rivets if you are going to re-use the grommets. If not, a wonder bar will pop them out and save a lot of time.

 again cut and capped the wires at the front where they came out of the wall leaving 6 to 12 inch pigtails. Roll it up and set the bundle aside.
We need to remove the fluorescent light lenses. You will find them nearest the windows and under the compartments. They run the length of the over head storage. With needle nose pliers, grab the rubber keeper strip and pull. This will release one side of the lens. The other side is held by a rubber compression gasket. Grab the
again cut and capped the wires at the front where they came out of the wall leaving 6 to 12 inch pigtails. Roll it up and set the bundle aside.
We need to remove the fluorescent light lenses. You will find them nearest the windows and under the compartments. They run the length of the over head storage. With needle nose pliers, grab the rubber keeper strip and pull. This will release one side of the lens. The other side is held by a rubber compression gasket. Grab the  lens firmly with both hands and pull it free. There is a lot of dust on the lens, so go slow.
 bi-metal blade. Start the cut about 3" away from the vertical supports to reduce blade vibration. Continue cutting thru the plastic under side, to and thru the rear frame.
It's time to remove the vertical supports. First, unfasten the nuts along the wall, then unscrew the supports on the ceiling freeing the 8' section. This will just fit out the door. Almost done.
bi-metal blade. Start the cut about 3" away from the vertical supports to reduce blade vibration. Continue cutting thru the plastic under side, to and thru the rear frame.
It's time to remove the vertical supports. First, unfasten the nuts along the wall, then unscrew the supports on the ceiling freeing the 8' section. This will just fit out the door. Almost done.