
 Removal of the Over Head Storage Compartments. Part 3
 The last thing to do is remove the horizontal supports on the walls and ceiling. 1st along the wall. There is the main heavy aluminum rail that is affixed with Star screws. The ballast aluminum plate base is riveted to it and is supporting both the black aluminum shield, attached by 2 Philips head screws and the lite aluminum bottom rail that is held by rivets.  Well, after that, the ceiling support is a breeze. Unscrew the heavy aluminum junction plate in the middle of the rail. Unbolt the rail, grab one end and wiggle the rail off the ceiling. That's it. We will deal with the wires later, just make sure they are all capped.
In approx. the middle of the supports, you will find a connection point for all 3 components. You can separate the rails here to make  for more manageable pieces. Go ahead and drill out or shear off the 2 rivets, then remove the 2 screws from the shield. Then un-do the heavy aluminum junction plate from the main heavy aluminum rail. Now remove the star screws, grab one end and wiggle the rail off the wall. The components are a little long and should be fed out a window but can fit out the door. Once outside, you can disassemble the components for salvage. We will be re-using a lot of this.
 for more manageable pieces. Go ahead and drill out or shear off the 2 rivets, then remove the 2 screws from the shield. Then un-do the heavy aluminum junction plate from the main heavy aluminum rail. Now remove the star screws, grab one end and wiggle the rail off the wall. The components are a little long and should be fed out a window but can fit out the door. Once outside, you can disassemble the components for salvage. We will be re-using a lot of this.
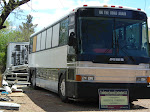
Note the bin over the driver's seat. We'll leave it there for maps and such. Our new place is getting larger by the day and I can't wait to get on the road again!


All the Best, Michael & Christi
Please Comment Below


No comments:
Post a Comment