
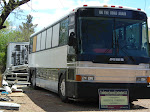
We installed 4 of the 9 window skins. Only because we wanted to see what they looked like.  We found the skins to be OK for now, but need a little bit more work on the finish. Some PUNKS stoned all the glass on the bus before we got it. Yes, ALL THE GLASS! *%#@* PUNKS! Here is what we did. Removing the windows was easy. Unscrew the keeper screws at the top right and left of each window frame. Then swing the window frame toward you just about level to the ground, then gently push and lift the window frame from the track. This is a gravity hinge, not a pin hinge. Place the window frame on a flat surface outside down. Remove the panic bar by grinding off the rivets but leave the window lock/keepers intact.
 Now remove the the inner compression gasket with a flat screwdriver. Then clean gasket for re-use. The glass will come right out by lifting from under the frame. You may find some corrosion in the framework. We used a wire brush, small flat screw driver and WD40 to remove it. We then placed a good bead of window sealant along the inside of the outside gasket. Place the window skin in the frame and press down along the edge for a good seal. Clean inside skin surface.
  Now you need to put some type of filler that is the same size and thickness as the glass. If the glass is un-usable then you can use 1/4 inch plywood, plastic or alike. Apply contact cement to inside skin surface and your filler.
 Then set the filler in place and press firmly. Now you can replace the inner compression gasket. We used WD40 as a lubricant and the gasket pressed into place. Flip the framed
  skin over and press down on the skin for a good seal. We put the skin frames back in the hinge, set the lock/keeper and added a set screw so the frame cannot move. The finish will do for now. We will get a pro paint job as time and $$$ allows.
 We found the skins to be OK for now, but need a little bit more work on the finish. Some PUNKS stoned all the glass on the bus before we got it. Yes, ALL THE GLASS! *%#@* PUNKS! Here is what we did. Removing the windows was easy. Unscrew the keeper screws at the top right and left of each window frame. Then swing the window frame toward you just about level to the ground, then gently push and lift the window frame from the track. This is a gravity hinge, not a pin hinge. Place the window frame on a flat surface outside down. Remove the panic bar by grinding off the rivets but leave the window lock/keepers intact.
 Now remove the the inner compression gasket with a flat screwdriver. Then clean gasket for re-use. The glass will come right out by lifting from under the frame. You may find some corrosion in the framework. We used a wire brush, small flat screw driver and WD40 to remove it. We then placed a good bead of window sealant along the inside of the outside gasket. Place the window skin in the frame and press down along the edge for a good seal. Clean inside skin surface.
  Now you need to put some type of filler that is the same size and thickness as the glass. If the glass is un-usable then you can use 1/4 inch plywood, plastic or alike. Apply contact cement to inside skin surface and your filler.
 Then set the filler in place and press firmly. Now you can replace the inner compression gasket. We used WD40 as a lubricant and the gasket pressed into place. Flip the framed
  skin over and press down on the skin for a good seal. We put the skin frames back in the hinge, set the lock/keeper and added a set screw so the frame cannot move. The finish will do for now. We will get a pro paint job as time and $$$ allows.
All the Best, Michael & Christi
See our other Blog;http://michaelhargisshow.blogspot.com/


No comments:
Post a Comment