Removal of the Over Head Storage Compartments. Part 1


At first, this looks pretty cut and dry. But as I look closer, I can see that these compartments are constructed very well with a lot of components and one heck of a lot of screws. OK, step by step.
1st, turn the master battery switch off.
Remove the doors by unbolting the gas struts. Then using a Philips head screw motor, remove the screws from the hinge and the door will come off. The door latch has 4 Philips head screws to remove it. I removed all the components in an assembly line style, ie; all the struts, all the doors, and so on. It goes faster that way.

Now remove the Comfort stations. Remove the 4 Philips head screws and it will hang down by the light and speaker wires.


Take them apart at the wire disconnects. These components have good parts that can be re-used. The lights we will use as reading and accent lights throughout the bus along
with the switches. I don't know what to do with the speakers.

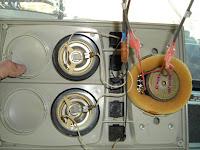
Next, remove the door hinge base and light cover. Remove the 4 Philips head screws and the mount will swing out to you. Lift it straight up and it will come free. Be careful of the 3' fluorescent bulb under the cover. Then remove the bulbs and put them in a safe place.
You can salvage the stainless door hinges by drilling out the rivets. Then remove the very back padded panel by 6 Philips head screws. Take a flat pry bar to the middle front edge to pop it loose.

Now remover the bottom padded cover held by 6 Philips head screws and silicone caulk. You will have to push from the bottom in order to free this panel.

Now remove the side panels with a Philips screw driver. You will find 4' fluorescent bulbs in the back of the compartment. Remove the bulbs and put them in a safe place.
There is a lot of aluminum to be salvaged for re-use or recycle in these compartments.

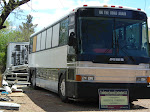
Here is the result of my Saturday. I spent the day creating this pile of stuff that is as long as the bus. This is the end of Part 1. I will be back at it today, (Sunday). There is still a lot to do.

All the Best, Michael & Christi
Please Comment Below


 At first, this looks pretty cut and dry. But as I look closer, I can see that these compartments are constructed very well with a lot of components and one heck of a lot of screws. OK, step by step.
1st, turn the master battery switch off.
Remove the doors by unbolting the gas struts. Then using a Philips head screw motor, remove the screws from the hinge and the door will come off. The door latch has 4 Philips head screws to remove it. I removed all the components in an assembly line style, ie; all the struts, all the doors, and so on. It goes faster that way.
At first, this looks pretty cut and dry. But as I look closer, I can see that these compartments are constructed very well with a lot of components and one heck of a lot of screws. OK, step by step.
1st, turn the master battery switch off.
Remove the doors by unbolting the gas struts. Then using a Philips head screw motor, remove the screws from the hinge and the door will come off. The door latch has 4 Philips head screws to remove it. I removed all the components in an assembly line style, ie; all the struts, all the doors, and so on. It goes faster that way.
 Now remove the Comfort stations. Remove the 4 Philips head screws and it will hang down by the light and speaker wires.

 Take them apart at the wire disconnects. These components have good parts that can be re-used. The lights we will use as reading and accent lights throughout the bus along with the switches. I don't know what to do with the speakers.
 Next, remove the door hinge base and light cover. Remove the 4 Philips head screws and the mount will swing out to you. Lift it straight up and it will come free. Be careful of the 3' fluorescent bulb under the cover. Then remove the bulbs and put them in a safe place.
You can salvage the stainless door hinges by drilling out the rivets. Then remove the very back padded panel by 6 Philips head screws. Take a flat pry bar to the middle front edge to pop it loose.
Next, remove the door hinge base and light cover. Remove the 4 Philips head screws and the mount will swing out to you. Lift it straight up and it will come free. Be careful of the 3' fluorescent bulb under the cover. Then remove the bulbs and put them in a safe place.
You can salvage the stainless door hinges by drilling out the rivets. Then remove the very back padded panel by 6 Philips head screws. Take a flat pry bar to the middle front edge to pop it loose.  Now remover the bottom padded cover held by 6 Philips head screws and silicone caulk. You will have to push from the bottom in order to free this panel.
 Now remove the side panels with a Philips screw driver. You will find 4' fluorescent bulbs in the back of the compartment. Remove the bulbs and put them in a safe place.
There is a lot of aluminum to be salvaged for re-use or recycle in these compartments.
Now remove the side panels with a Philips screw driver. You will find 4' fluorescent bulbs in the back of the compartment. Remove the bulbs and put them in a safe place.
There is a lot of aluminum to be salvaged for re-use or recycle in these compartments.
 Here is the result of my Saturday. I spent the day creating this pile of stuff that is as long as the bus. This is the end of Part 1. I will be back at it today, (Sunday). There is still a lot to do.
 All the Best, Michael & Christi
Please Comment Below
All the Best, Michael & Christi
Please Comment Below


Excellent. I'm in the process of converting an old greyhound bus into an rv, and this has been the biggest problem so far. Thanks for the helping hand!
ReplyDelete