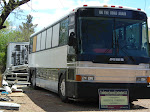
Today we got a lot done to Mrs.  Jones. Jeff showed up at 9 am and
  started to cut in the stove top. I installed Christi's capt. chair. Phil, "Our Phil guy", showed up and installed the 6250 watt Coleman genny with a slide he made from old bed rails. Then we ran a 50 amp yellow cord from the genny to the back bay so we can plug in while underway. It will do until our big Onan gets rebuilt.
 Jones. Jeff showed up at 9 am and
  started to cut in the stove top. I installed Christi's capt. chair. Phil, "Our Phil guy", showed up and installed the 6250 watt Coleman genny with a slide he made from old bed rails. Then we ran a 50 amp yellow cord from the genny to the back bay so we can plug in while underway. It will do until our big Onan gets rebuilt.
 Christi picked up  her pantry doors at
 her pantry doors at
 Cate's Hill trailer sales for $20 bucks on Friday so we laid out the face and Jeff put it together. I ran the rear roof air 12/2 wire. Smoked my good bit, Rats!  Then Jeff started to frame the bedroom closet and Phil started on moving the air brake button. Where it is located made it hard to get in and out of the drivers seat, so Phil moved and modified
 Then Jeff started to frame the bedroom closet and Phil started on moving the air brake button. Where it is located made it hard to get in and out of the drivers seat, so Phil moved and modified
the housing to  sit in a better place. He cut the housing with a hand grinder and then welded it together with my new Mig welder,
  (It's coming with us. A singer with a welder, Look out!) We had to pull out the spare tire to get to it. Good time for an inspection of the tire and the compartment.
 sit in a better place. He cut the housing with a hand grinder and then welded it together with my new Mig welder,
  (It's coming with us. A singer with a welder, Look out!) We had to pull out the spare tire to get to it. Good time for an inspection of the tire and the compartment.
 They look good but dirty. Hmm, I wonder what Christi is doing? Hehe. Next we laid out the flat
  screen TV mount. To the salvage pile we go. We used the HD chair and upper compartment mounting aluminum rails. Jeff did a good job on this one. We saved a bundle! Also, the plumber Jack Jackson of Straight Flush Plumbing came over and lined out the water, waste & gas systems. I will cut holes in the AM so he can start running lines.
 P.S. from Christi: Jared, (my son), and I spent the morning at Walmart, Lowe's and Home Depot buying parts for Mrs. Jones. When we got home I found an injured Michael with a paper towel wrapped around his thumb. He managed to take a chunk out of it when the drill gun slipped. Poor baby! So I found the bag balm and a large bandage and sent him back to work. We only have 3 weeks, you know.I had planned to get back to making Mrs. Jones pretty inside, (painting, yippee!), but soon found the rig was overrun with 3 sweaty, dirty males. Too much testosterone for me. I went in the nice cool house and did paperwork all afternoon. Aaaah.
All the Best, Michael & Christi
See our other Blog;http://michaelhargisshow.blogspot.com/